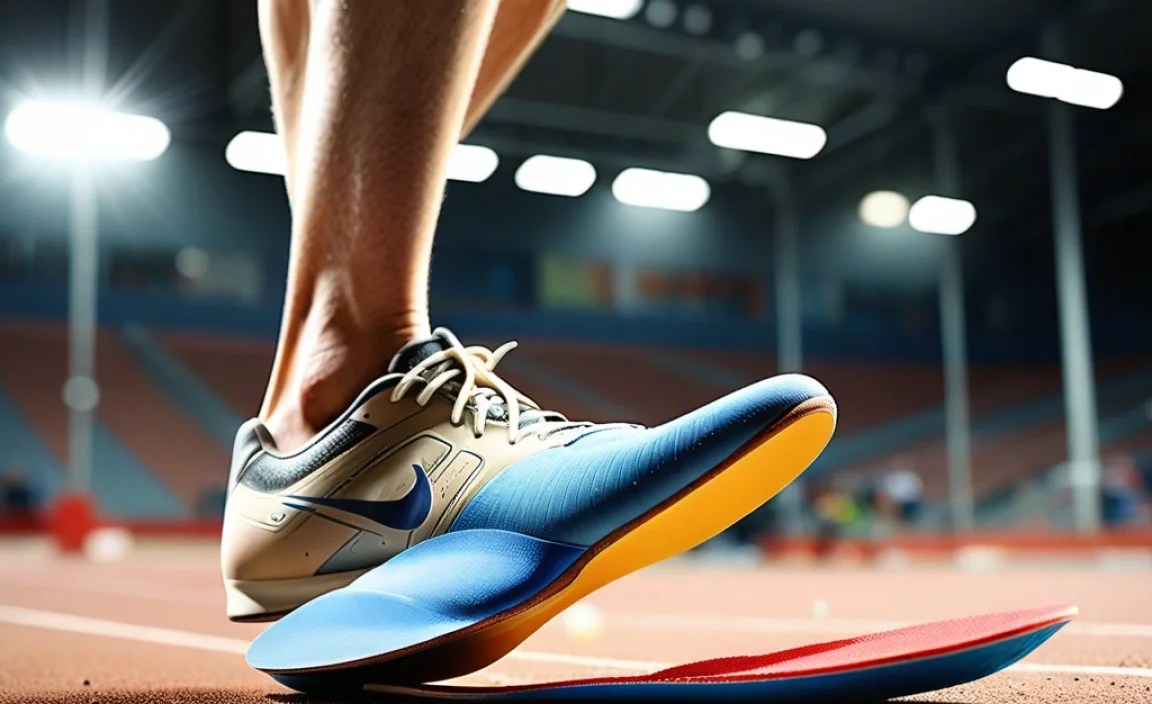
Insoles for discus throw shoes can significantly boost stability, cushioning, and power transfer, leading to improved performance and reduced injury risk.
Are you an athlete looking to gain an edge in your discus throw performance? Your shoes play a crucial role, but have you considered what’s inside them? Many discus throwers overlook the incredible impact that the right insoles can have. You might be experiencing discomfort or not reaching your full potential because your current shoe setup isn’t optimized. It’s a common frustration, but the good news is, a simple upgrade can make a world of difference. We’re here to guide you through choosing and using the best insoles to elevate your game. Discover how these small inserts can lead to bigger throws!
Our journey will cover everything you need to know about insoles for discus throw shoes. We’ll explain why they matter, what to look for, and how to find the perfect fit to enhance your stability, power, and comfort on the field.
Why Insoles Matter for Discus Throwers

Discus throwing is a complex, powerful athletic event that demands exceptional stability, precise force transfer, and efficient energy return. While discus shoes are designed with specific features like smooth soles and pivot points, the internal structure provided by the shoe’s original insole is often basic and can be significantly improved.
Think of your feet as the foundation of your throw. When you’re generating immense rotational force, any instability or lack of proper support can lead to wasted energy, reduced power, and increased risk of injury. The right insoles act as a critical upgrade to this foundation, providing:
- Enhanced Stability: A stable foot allows for a more powerful and controlled rotation. Insoles can fill unique contours of your foot, preventing excessive pronation (rolling inward) or supination (rolling outward).
- Improved Shock Absorption: The impact of landing after a throw, or even just the force generated during the wind-up, can be significant. Good insoles cushion these impacts, protecting your joints and reducing fatigue.
- Optimized Power Transfer: When your foot is firmly supported and aligned, the force you generate from the ground up is transferred more efficiently through your body to the discus. This means more of your effort translates into distance.
- Comfort and Injury Prevention: Proper arch support and cushioning can alleviate pressure points, prevent common foot ailments like plantar fasciitis, and reduce the strain on your ankles, knees, and back.
The standard insoles that come with most athletic shoes are often made of generic foam that quickly compresses and loses its supportive qualities. For a sport as demanding as discus throwing, this generic approach simply isn’t enough to maximize performance or protect your feet.
Understanding Insole Basics for Athletes

Before diving into specifics for discus throwers, let’s cover some fundamental insole concepts. These basics will help you understand the different types and features available.
Types of Insoles
Insoles can generally be categorized by their level of support and cushioning:
- Supportive Insoles (Orthotic Insoles): These offer structured support, often with a rigid or semi-rigid heel cup and arch support. They are designed to correct biomechanical issues and provide a stable base. Some are custom-molded, while others are designed for common foot types (e.g., high arch, flat feet).
- Cushioning Insoles: These prioritize shock absorption and comfort. They are typically made of softer materials like gel, foam, or air cushioning. While they enhance comfort, they may offer less structural support than orthotic insoles.
- Combination Insoles: Many insoles blend support and cushioning. They aim to offer a balance of comfort and stability, making them a popular choice for many athletes.
Key Insole Features to Consider
When looking at insoles, pay attention to these features:
- Arch Support: This is crucial for aligning your foot and distributing pressure evenly. Insoles come with varying levels of arch support, from minimal to substantial.
- Heel Cup: A well-defined heel cup cradles the heel, providing stability and shock absorption, which is vital for minimizing impact during athletic movements.
- Material: Different materials offer different benefits
- EVA (Ethylene-vinyl acetate): A common, lightweight foam that offers good cushioning and shock absorption.
- Polyurethane (PU): More durable and denser than EVA, offering long-lasting support and cushioning.
- Gel: Provides excellent shock absorption and can add a cushioning layer.
- Carbon Fiber: Rigid and lightweight, used in high-performance insoles for maximum support and energy return.
- Durability: For athletes, insoles need to withstand significant wear and tear. Look for materials and construction that promise longevity.
- Breathability: Insoles with breathable materials or design features can help manage moisture and prevent odor, keeping your feet more comfortable during long training sessions.
What Makes Insoles Ideal for Discus Throw Shoes?
Discus throwing requires specific biomechanical actions that can be significantly enhanced by the right insoles. The primary goals are maximizing rotational power, maintaining balance during complex movements, and protecting the feet and lower body from excessive stress.
For the Discus Thrower, Focus On:
- Firm Arch Support: A stable arch is fundamental for effective force transfer. When you push off the ground, a well-supported arch prevents energy loss. Insoles that rigidly support your natural arch are paramount.
- Deep Heel Cup: The heel strikes the ground during the initial stages of the throw and is critical for stability during the rotational phase. A deep heel cup will lock your heel in place, preventing slippage and providing a stable platform.
- Semi-Rigid or Rigid Construction: While cushioning is important, excessive flexibility in an insole can lead to a “mushy” feeling and a loss of power. For discus, semi-rigid or rigid insoles (often with a carbon fiber or firm TPU base) help ensure maximum energy return and stability.
- A Flat, Contoured Surface: Discus shoes typically have smooth, often somewhat flat soles to facilitate smooth turns across the throwing circle. Your insoles should complement this by providing a stable, supportive surface that doesn’t interfere with your foot’s ability to pivot or slide. Look for insoles with minimal forefoot flexibility that don’t have aggressive contours that could catch.
- Impact Absorption: While not as high-impact as jumping sports, the forces generated and the landings after throws still benefit from good shock absorption. This protects your subtalar joint and overall lower kinetic chain.
What to Avoid
- Overly Soft/Mushy Insoles: These can absorb power and reduce stability.
- Aggressive Metatarsal Pads: These can interfere with the natural sliding motion required in discus.
- Insoles designed for high-impact running: While good for cushioning, they might be too flexible or lack the specific stability features needed for rotational athletes.
Choosing the Right Insoles: A Step-by-Step Guide
Selecting the perfect insoles for your discus throw shoes can feel daunting, but by following these steps, you can make a confident choice.
Step 1: Assess Your Foot Type and Needs
The first step is to understand your feet.
- Arch Height: Do you have high arches, neutral arches, or flat feet? You can test this with a wet footprint test. Wet your feet, step onto a piece of paper, and examine the imprint.
- Pronation: Do your feet roll inward too much (overpronation), not enough (supination), or just right ( neutral)? Overpronation can lead to a loss of power and instability, while excessive supination can reduce shock absorption.
- Existing Foot Pain: Are you dealing with specific issues like plantar fasciitis, heel pain, or arch soreness? This can guide your choice towards insoles with targeted support or cushioning.
For discus throwers, a neutral or slightly overpronating foot type often benefits most from insoles that provide stability and control. High arches might require more cushioning, but stability remains key.
Step 2: Consider Insole Construction and Materials
Based on your foot type and the demands of discus throwing, decide on the desired construction and materials.
- For maximum stability and power: Look for insoles with a firm, semi-rigid base, often made of materials like a dense PU or a carbon fiber composite. These provide excellent support and energy return without excessive flex.
- For added comfort and shock absorption: If you experience discomfort or want to enhance the feel, a combination insole with a stable base and a top layer of denser, responsive foam or gel can be beneficial.
- Heel cup depth: A deeper heel cup is generally better for discus throwers as it helps stabilize the foot during rotation.
Step 3: Measure and Fit
Proper fit is non-negotiable.
- Insole Size: Insoles often come in shoe sizes (e.g., Men’s 8-10). It’s crucial to get the correct size range for your discus shoes.
- Trimming: Many insoles are designed to be trimmed to fit your specific shoe size and shape. Always follow the manufacturer’s instructions for trimming, using your original shoe insole as a template.
- Try Them In: If possible, try insoles in your actual discus shoes. Walk around, simulate some throwing movements, and see how they feel. There should be no pinching, rubbing, or excessive slipping.
Step 4: Look for Specific Athlete-Focused Features
Some brands offer insoles specifically designed for rotational athletes or sports that require high levels of stability. These might include features tailored to prevent foot slippage within the shoe during fast movements.
Step 5: Don’t Be Afraid to Seek Professional Advice
If you’re unsure about your foot type or specific needs, consult with a podiatrist, a sports medicine specialist, or a knowledgeable athletic footwear retailer. They can provide personalized recommendations.
Recommended Insole Features for Discus Throwers
To synthesize the information, here’s a breakdown of what to prioritize:
| Feature | Why It’s Important for Discus Throwing | What to Look For |
|---|---|---|
| Arch Support | Ensures proper foot alignment and efficient power transfer from ground to body. Prevents energy loss. | Firm, consistent support. Not overly flexible. Matches your natural arch height (medium to high support often preferred). |
| Heel Cup | Stabilizes the foot during rotation, preventing slippage and improving balance. Crucial for a confident foot plant. | Deep and well-defined. Should cradle the heel securely. |
| Stiffness/Rigidity | Maximizes energy return and prevents foot compression, leading to a more powerful throw. | Semi-rigid to rigid construction. Materials like dense PU, TPU, or carbon fiber composites are ideal. Avoid overly soft or compressible foams. |
| Surface Profile | Complements the smooth, flat sole of discus shoes, allowing for fluid rotation and preventing catching. | Generally flat or with a subtle contour that doesn’t interfere with pivoting. Minimal or no aggressive forefoot padding. |
| Durability | Withstands the intense forces and repetitive movements of throwing training and competition. | High-density materials like PU, durable composites. Check reviews for long-term performance. |
| Breathability | Helps manage moisture to keep feet comfortable and prevent issues like blisters or fungal infections during long training sessions. | Look for materials with perforations or moisture-wicking top layers. |
Insole Reviews: Top Picks for Stability and Performance
While specific models can change, here are general types and brands known for producing insoles that align with the needs of rotational athletes like discus throwers. Always check the latest product descriptions for features aligning with the table above.
1. High-Performance Orthotic/Performance Insoles
These are often designed for sports that demand significant lateral movement, agility, and power transfer. They typically feature a semi-rigid base and a well-defined heel cup.
- Example Features: Carbon fiber or rigid nylon plates, deep stabilizing heel cups, firm EVA or PU midsole for shock absorption and support. Some may offer different levels of arch support.
- Why they fit: Excellent for maximizing stability and power transfer, crucial for discus throwing. The rigid structure helps prevent energy loss during rotation.
- Consider: Brands like Superfeet (e.g., their Performance or Hockey lines), Currex (e.g., the ProLine for dynamic athletes), or higher-end athletic brands that focus on biomechanical support.
2. Athletic Support Insoles
These strike a balance between support and cushioning, often suitable for a range of sports. They usually have a moderate level of rigidity and good arch support.
- Example Features: Combination of firm foam (like EVA or PU) with a stabilizing heel cradle. Moderate arch support and some forefoot flexibility.
- Why they fit: A good all-around choice for athletes who may also participate in other activities. They offer a solid base for rotational movements without being overly stiff.
- Consider: Brands like Powerstep, Sole Footbeds (e.g., the Performance series), or some offerings from specialized running shoe brands that have a focus on stability.
3. Basic Stability Insoles
For athletes who need a general upgrade from stock insoles and don’t have severe biomechanical issues, these offer increased stability and cushioning.
- Example Features: Firmer foam than stock insoles, sometimes with a mild heel cup and basic arch contouring.
- Why they fit: An accessible entry point for improving foot support and comfort. They provide a noticeable upgrade in stability over standard insoles.
- Consider: Many sporting goods stores will carry house brands or basic models from major athletic footwear companies that fit this description.
Important Note on Reviews:
Always read recent reviews for specific products, paying attention to comments from athletes in sports requiring rotational power or quick, stable movements. Look for feedback on durability and how well the insoles hold up under intense training.
Incorporating Insoles into Your Discus Throw Training
Simply inserting insoles into your shoes is the first step. To maximize their benefit, you need to integrate them thoughtfully into your training routine.
1. Break-In Period
Even the best insoles may require a short break-in period. Over the course of a few training sessions or a week:
- Start by wearing them for shorter durations (e.g., during warm-ups or cool-downs).
- Gradually increase the time you wear them during full throwing practice.
- This allows your feet and body to adapt to the new level of support and cushioning, reducing the risk of initial soreness or discomfort.
2. Customization (Trimming)
As mentioned, most insoles are designed to be trimmed. This is a critical step for an optimal fit:
- Place your original shoe insole on top of the new insole.
- Trace around the original insole, particularly the heel and along the sides.
- Use sharp scissors or a craft knife to carefully trim the excess material.
- Always trim a little at a time and test the fit in your shoe before trimming more. A perfect trim ensures the insole doesn’t shift or create pressure points.
3. Regular Inspection and Replacement
Insoles, especially those used by athletes, have a lifespan.
- Inspect your insoles regularly for signs of wear and tear, such as compressed foam, flattened arches, or worn-out cushioning.
- The lifespan can vary significantly depending on the material, your weight, usage frequency, and the intensity of your training. Generally, performance insoles can last anywhere from 300 to 500 miles of running, or 6-12 months for heavy athletic use. For discus throwing, this might translate to a similar timeframe, or when you notice a decline in support or comfort.
- Replacing worn-out insoles is crucial for maintaining performance and preventing injuries.
4. Complementary Foot Care
Insoles are part of a foot health strategy, not the entire solution. To get the most benefit:
- Strengthening Exercises: Incorporate simple foot and ankle strengthening exercises into your routine. This helps build intrinsic foot strength that works in conjunction with your insoles. Examples include toe curls, heel raises, and ankle circles. The Johns Hopkins Medicine provides excellent guidance on foot pain-reducing exercises that can benefit athletes.
- Stretching: Regular stretching of the calf muscles, hamstrings, and quadriceps can improve overall biomechanics and reduce strain on the feet.
- Proper Footwear: Ensure your discus shoes themselves are well-fitting and appropriate for the sport. Insoles enhance shoe performance but cannot correct fundamental issues with the shoe itself.
